Riding the Wake

Riding the Wake
On the Lake

Tuesday, July 8, 2008

A Beginners Guide to Wakeboarding


The Basics
Getting started is easy if you follow these simple steps. Have the right equipment, the latest pro board is not always the best to learn with. Give yourself a chance and get a board that is forgiving & helps you to progress. A larger board with one or more large rear fins helps to give the board direction which is important when learning.

A shorter rope - about 15 meters (50') gets you closer to the boat in a bigger wake, this will be helpful for learning to wakeboard, you can find more information on ropes and handles here. A buoyancy vest is not only basic safety equipment but it will also save you a lot of energy. The driver should remember that you need a lot less speed to get going and to stay planing than water skiing. 35-40 kph max. A wakeboard offers more resistance when starting, so start slowly!

Stance
(how and where you stand on your board). Your first step is determining whether you are regular (left-foot-forward) or goofy (right-foot-forward) . For those of you who skateboard or snowboard, this is easy. lf this is your first board sport, don't panic. Stand up, feet together and have someone push you from behind (sorry - on land). Whichever foot goes forward first is your lead foot.

Bindings Placement
Riders just getting started should try placing the bindings at about shoulder-width with the rear foot slightly farther back (closer to the rear fin) to aid with directional stability. The angle of your bindings is important. Start with the rear foot straight across the board (O degrees) or slightly forward to 9 degrees (one set of holes in the base plate). Your front foot should be at an angle of 9-27 degrees (2-3 sets of holes) to get started. Remember that this is just a guide and that your stance should feel comfortable. Keep in mind, however, that one of your first goals is going to be to ride revert (backwards). For this you will want something closer to neutral (0 / 0 degree) stance. tip: Before you get started, double-check the security of your fins and bindings. Do this every time you hit the water. You should even periodically check them during your ride after a fall.

The Deep Water Start
Start in the water, floating on your back with a buoyancy vest. The board should be perpendicular to the rope with your arms either side of your front knee . Signal the driver to put the boat just in gear. As you are pulled slowly forward, the pressure against the board will allow you to get into the proper starting position with most of the board below the surface of the water. Let the pressure on the board push your knees into your chest, then push your front foot forward toward the boat. Signal the driver to hit it and remain in a crouched position. As the boat begins to go, keep your arms slightly bent in near your lower stomach. Shift your weight toward the front foot while keeping the nose above the water. As the water begins to give you support, slowly rise to the standing position by extending your legs until your knees are slightly bent.

Once you're up, get comfortable on your board with slightly more weight on your rear foot. Let your hips and shoulders turn away from the boat. Riders with a skiing background have a tendency to try to face the boat this will often lead to a face plant as they catch or drop their front edge. Practice getting comfortable in the sideways position and relax. The key to the deepwater start is letting the boat do the work. Stay down low and stand up slow!


Remember
Set up perpendicular TO THE LINE floating on your back. As you start - Compress. LEAD WITH THE FRONT FOOT AND Let the line pull you up on the board. It is one continuous flowing motion and you should not be dragged through the water for long. Compress and stand up straight away. There is no harm in being up before fully planing.

The Switchstance Start
(Riding 'fakie', 'revert' or backwards) should be learnt as soon as possible. Most riders find it easier to start normal, then push the board to revert as soon as the board starts to plane off. Once this is mastered, you can go to a more direct approach by altenating your front foot every time you start. Don't wait to learn to ride switchstance; you'll need it for many tricks.

Crossing the Wake
Is easy if you approach it slowly at first with knees bent. The faster you go the more you need to 'suck it up' with your legs if you do not want to jump.

Jumping the Wake
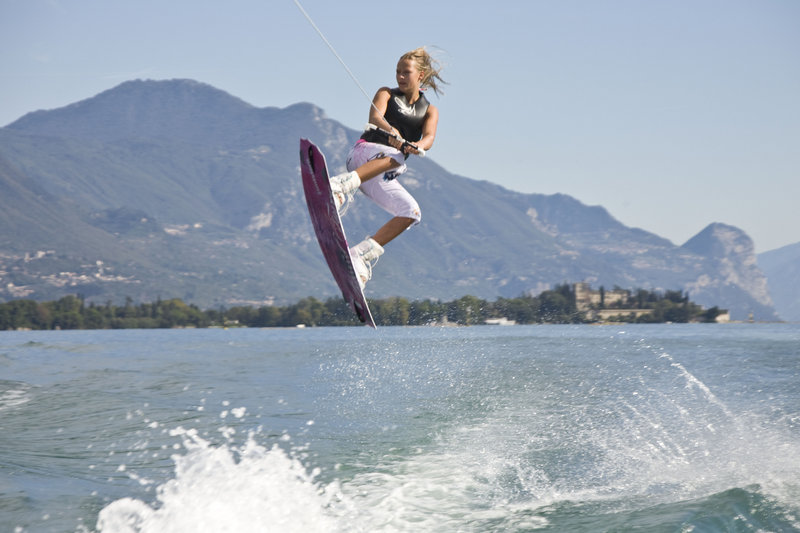
Is easy. Compress just as you approach. As the wake lifts the board extend your legs and body. It is important to stay cantered over the board. On landing let your legs absorb the impact. The key to getting good height in your jumps is to edge ALL THE WAY through the wake. A common problem is to ease up the pull on the rope as you approach the wake and flatten out the board loosing critical energy which lifts you into the air. Loading or stretching the line primes it with the energy which 'pops' you into the air. Cut hard and late.
Sunday, July 6, 2008

Beginners Tips 7: "Jumping the Wake"

The key to a good wakeboarding jump or pop off the wake is not determined by how fast you cut to the wake, but rather your progressive edge towards the wake with a tight towrope.

You begin by smoothly rolling out of your turn and gently edging towards the wake. If you turn too fast rope slack will occur and you will be jerked forward and off balance.

Apply pressure to your heels and lower them into the water a little deeper the closer you get to the wake. Your body position should be leaning away from the wake with your knees slightly bent but stiff. Hold the handle palms down near your waistline, close to your body with your arms bent.

Maintain your edge through the wake. Don't flatten the board on the water as you approach the wake. Keep your weight evenly distributed on the board. About 2-3 feet before reaching the wake begin your pop by extending your body more to a standing position.

While in the air keep your chest open and your head up.

Don't look down.

Your wakeboard should be pointing towards your landing spot.

Upon landing, bend your knees so that the shock will be absorbed.

Beginners Tips 6: "Progressive Heelside Edge"

Learning how to edge progressively is one of the most important skills in wakeboarding. Virtually every trick uses a progressive edge, as it's the key to getting the most height possible while staying under control. Every wakeboarder should take the time to learn how to edge progressively, it'll help out in the long run. Here we explain the keys to heelside progressive edging.
First, let's define what we mean by a progressive edge. A progressive edge is when you edge on your wakeboard and build up the amount of edge slowly, so that your maximum edge is when you reack the top of the wake. By "maximum edge" we mean that your speed and line tension are at their hardest when you reach the wake.

Think of how a pendulum swings. As it goes out to it's highest point, the ball on the pendulum is moving at it's slowest. When it swings back towards the bottom, it starts slowly, and builds up speed "progressively" until it's at it's fastest point at the bottom. In wakeboarding terms, the wakeboarder is the ball cutting out wide, and you want to wait for the boat to begin pulling you back towards the wake, as it starts to pull you, you begin edging in with the proper body position, and build your edge so it's at it's hardest as you reach the wake, which is the bottom in our pendulum example.

Prerequisties

Before trying to learn the progressive edge for jumping, you should be able to do the following:

1. Ride and be able to edge and carve well.
2. Be comfortable crossing the wakes at high speed.
3. Be able to ollie.

Performing the Heelside Progressive Edge

The setup for a progressive edge is to casually cut out about 10-1 feet outside the wake on your heelside. You want to stand tall and just ride straight while waiting for the boat to begin to naturally pull you back towards the wake. Resist the urge to begin your edge earlier then that. Stand tall, and keep the handle in tight as the boat begins to drift you back in.

As the boat starts pulling you in, lean back and begin to put pressure on your heels. You want an even amount of weight on both feet, and really focus on keeping the handle low and in tight to your body. Stay relaxed.

Continue to build a harder edge by leaning back harder, and applying more pressure to your heels. How much you crouch down is up to you, just make sure you keep the handle in tight and keep edging hard.

As you approach the top of the wake, this is where you need to stand tall. Notice how the rider keeps his line tension by keeping the handle in tight to his hips. Standing tall and keeping the line tight is what generates your pop (air). You don't want to ollie, or physically jump. Just stand tall and keep your weight even over both feet.

If you stand tall and keep the rope in tight after eding progressively into the wake, you should get good pop. To help control it, continue to keep the rope in tight and get your eyes on the horizon. Now you're ready for a whole new world of tricks.

This article is courtesy of Pat McCarthy

Beginners Tips 5: "Gripping the Tow Rope"


How you hold the tow rope makes a big difference in how you will perform behind the boat and on the water.
When wakeboarding, after you have done your deepwater start, you'll hold the tow handle parallel to the water with palms down and knuckles pointed up. Keep the handle low and on close to your lead hip. See the photo for illustration on the right side of this page.

When slalom waterskiing, after you have done your deepwater start, you'll want to hold the handle perpendicular to the water. Your grip will be hand over hand. The reason for this grip is so the handle will be in position for when you let go of the handle to stretch around the buoys and then re-grip the handle as you set yourself up to round the next buoy.

Beginners Tips 4: "Deepwater Starts"

Let your boat driver know that a slow and gradual speed increase is all that is needed to pull a wakeboarder out of the water
.
The board needs very little to plane out of the water. Your maximum wakeboarding speed should be around 14-18 miles per hour.

The shorter the rope, the easier it is to get up. Rope length should be somewhere between 30 and 50 feet.

As you are in the water, have your body facing the boat, and the board perpendicular to the boat. The board will naturally swing towards the boat as you plane out of the water. Make sure the toe of the board is slightly above water.

Have your arms extended and placed on each side of your front knee as you hold on to the handle.

Pull your ankles in close, with your knees close to your chest, in a squatting position. The closer you are to the board, the easier the start will be. Push your chest slightly up.

Relax and do not fight it. This cannot be stressed enough.

Weight distribution and balance are key. As the boat starts to pull you out of the water, have about 60 percent of your weight on your front foot, and the other 40 percent on your back foot. This will cause the board to not waggle and go out of control as the boat pulls you up.

Stay squatted down until you are out of the water and balanced. Stand up slowly and with your upper body first.

Shift your weight back after you have stood up. Don't try to stand up too fast. Take it slow.

After you are up, keep the rope handle low to gain more control.

What You Need:

Boat and Boat Driver
Wakeboard
Towrope
Life Jacket
Spotter

Beginners Tips 3: "Wakeboard Binding Set Up"


Having your bindings/boots properly set up on your wakeboard is important to maintain comfort while riding and to match your board riding skill level. How a rider stands on a wakeboard is called a "stance." There are different stances that work best with beginner, intermediate, and advanced riders.

You must first determine which foot will ride forward, or in front, on the wakeboard. If you don't know, use my article "Which Foot Forward?" to help make your decision.

Wakeboards and binding plates (the plate on which the boot rests) come with multiple pre-drilled holes that allow you to easily change the angle and position of the bindings on the board. The angle at which the binding is placed on the board is referred to as "degrees," just like in geometry.

The width at which the bindings will be apart can be determined by jumping up in the air. However your feet land naturally on the ground will most likely be the width apart at which you'll set your bindings. It is usually shoulder width apart.

Tip: Get in the practice of making sure your bindings are snug and secure before you hit the water. Taking this extra step can help prevent injuries.

Beginner - Recreational Stance for Wakeboard Binding Set-Up:

This stance is good for learning deepwater starts, forward riding, turning and carving, and basic jumps and hops. The rear binding needs to go fairly far back on the board so that most of the rider's weight will press on the rear fin, making the board easier to control and navigate.

Back Binding - Zero degrees at the backmost position on the board.

Front Binding - Pointing towards the front of the board at a 15 - 27 degree angle (2-3 holes from the center of the binding plate). Place at a natural distance from the rear binding.

Intermediate - Advanced Stance for Wakeboard Binding Set-Up

Once you've had your share of time on the water and your skills improve you can begin moving the bindings forward a little bit. Tricks tend to be easier with the bindings more in the center of the board. A centered stance aids in spins, riding backwards (fakie) surface tricks, and more. Your goal is to gradually lessen the angle degree of the front foot.

Back Binding - Zero to nine degrees - one hole from the back.

Front Binding - Approximately 18 degrees - about 4-5 holes back.

Advanced - Expert Stance for Wakeboard Binding Set-Up:

When you get to the point that you are comfortable riding forwards and backwards it is time to try for a more neutral stance, slightly back from the center of the board. This stance most resembles your stance while standing on land, with feet slightly angled outward, somewhat like a duck's stance. This stance gives you the ability to perform the same going either direction.

Back Binding - Nine degrees - about three holes from the back.

Front Binding - Nine degrees - about four holes from the front.

Beginners Tips 2: "Which Foot Forward?"

Here are ways to help you decide which foot to put in the forward in your wakeboard bindings

The Falling Test

Stand with your feet together and close your eyes. Ask someone to gently push you forward from behind. Which ever foot goes forward first to catch your balance is the one you should try putting in the forward wakeboard binding or slalom water ski binding. Right foot forward is considered "goofy footed."
This is most effective if the person in question stands with their eyes closed and then you take them by surprise when pushing them forward. This way they can't subconsciously choose which foot to put forward.

The Pants Test

Whichever foot a person puts in a pair of pants first is the foot that should go in the front binding.

The Demo Test

A great way to decide the forward foot is to demo a water ski or wakeboard and try both your left and right foot in the front binding. Do whatever feels the most natural. Either way, you are likely to feel a little less balanced on your off-side when crossing the wake. Off-side is when your back leg is closest to the wake.

The Ski Lift Test

Have the novice start on doubles (combo skis). Tell the skier to lift one ski out of the water about six to 12 inches for two to six seconds with their ankle flexed up so the tip of the ski doesn't catch the water.
Next, instruct the skier to alternate between their left and right ski for two to six minutes. Make sure the skier keeps the handle at hip level and that the handle remains quiet (meaning not to pull using the arms) and keep their chin up. After this process, the skier will definitely know which foot is easier to balance on. That foot should be the front foot on the single ski."